Hey :)
Today's weather is my absolute favorite.
There is no better day for creating and feeling romantic then a rainy day... I love drinking hot chocolate or (better) hot coffee and dreaming up something beautiful.
Thank you, God, for rain and the color gray.
Here's the D.I.Y. I promised you a few days ago!
Remember making paper airplanes in elementary school? I do. :) I used to do it for hours with my little brother, and we would try to come up with new airplanes that would fly as long as possible. Mostly they just nosedived or spiraled and we would shout "Mayday, mayday!" but it gave us hours of play.
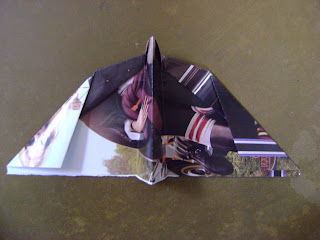
This is a prettier and more sophisticated version of a paper airplane that my super creative dad made up while playing the above game with my brother the other day... In the shape of a bird! I saw it and knew exactly what I would do if I was making it, and so I asked him if I could do a blog post on it and he said sure!
If you're interested in making this pretty toy, keep on reading. This D.I.Y. came out waaaaay longer then I expected, but since it involves paper folding, I felt like it wouldn't be a good idea to consolidate the steps. It can get a little origami-ish at times, but I did my very best to photograph accurately.
Here we go!
Materials needed:
A fun magazine
scotch tape or scrapbooking tape squares
You really don't need scissors, but I put them in my picture for some reason.
Start by ripping out just 2 pages from your magazine. This is all you'll need, so once you've done this you can set your magazine aside. In order to rip the pages out in a straight line, without losing part of the page to the binding, press down on both the page you want and the opposite side of the magazine very close to the binding and then in a slow twisting motion pull the page away. As long as you are pressing down and don't go too fast, the page should pull away cleanly.
I picked a Burberry perfume/cologne add and also a Tommy Hilfiger add because they had really complimenting colors and I liked the vintage look of both adds. :)
So you'll start by making the wings of the bird. Take your first piece of paper and fold it in half longways. Then fold it in half shortways and unfold just the short fold so it looks like this.
Next, with the folded edge farthest from you, take the top right corner and fold it toward you at an angle to about 3/4 of the way across.
Repeat this on the left side. You can copy the fold exactly by re-folding your paper on the short fold you already made, making the angled fold, and then unfolding it again. You'll use this technique alot during this project, so just to make sure you understand what I mean...
Next, you will make another angled fold on top of the one you just made. The bottom edge of this fold will be parallel to the edges of the paper closest to you. Parallel, but not flush against the edges. There should be about 1/4 of an inch of space between the two edges...
Copy the fold on the other side with the same technique you used before.
The wings are almost done! Next, make two more folds in the center to create a "spine" for the wings to attach to the body. Fold the wings in half along the center fold you already made, then fold one wing back down the opposite direction with about an inch of space between the folds.
The last step is to add small pieces of tape or scrapbooking squares to the bottom corners of the angled folds you made.
Set the wings aside. Now you're going to work on the body of the bird.
Take your second piece of paper and fold it in half longways, exactly like you did with the first piece. Open the piece back up and flip it so that it's open like a book. Take the outside left edge of your paper and line it up flush with the fold you just created. Then flatten the new fold you just made.
Repeat this on the other side, to make a double-door looking shape.
Fold the whole piece in half again longways, inward so that the center edges are on the inside.
Then take the now-outside edges and fold them backward to make an accordion shape. It should look like this.
Flip it over so that the "double doors" are now facedown. Take the top left corner and fold it down at a right angle with the crease closest to it, and make it completely flush with said crease. This makes a very small "dog ear" shape like what you would do to a book page. Repeat on the other side.
Next comes a tricky part. Push the top corner of the very center fold back on itself to make a triangle-shaped depression, and press down the edges to make it stay in place. When done correctly, it looks sortof like the Star Trek symbol. The fold should be about an inch and 1/2 long.
Here's the view from the top...
And underneath...
And from the side, when the piece of paper is folded back in half...
If your paper isn't already folded in half like above, do so. Then move to the bottom of your paper, which will be the tail.
Take the bottom left corner of your paper and fold it inward on an angle toward the center fold. It will overlap the edge by about 1/2 an inch.
Here comes another tricky part. Fold the corner you just moved back the other direction, but make the fold in the same place that you created a fold longways on way at the beginning. Leave the entire spine of the bird un-touched. Don't let the fold travel across the outer crease. By doing this, you're making a sortof half-fold that creates the amazing tail shape of this bird.
Repeat this on the other side.
To give you a better perspective, the fold literally begins and ends in between the blades of my scissors.
Add two more "dog ears" on each of the corners that you've been working on, downwards toward the belly of the bird. These won't be at right angles, more like 45 degree angles.
Almost done! Go back to the nose of the bird, and accordion all the folds together. Add tape or scrapbooking squares just to the tip of the nose so it has a little weight and keeps it's bird shape.
Now just add them together! The spine of the wings should fit right against the belly of the bird. The wings sit pretty far forward, near the head.
Just add a few pieces of tape to the wings' spine and then stick them onto the bird's tummy!
Done! The best part of this pretty bird is that it really is a paper airplane and it really does fly. :) At least, mine does. I hope yours does too!
Thanks for reading this D.I.Y., especially if you got all the way to the end. Haha
Happy Sunday!
New week tomorrow. Are you ready?
-Kierna


